Difference between revisions of "New Player Guide"
UO Evolution (talk | contribs) |
UO Evolution (talk | contribs) |
||
| (46 intermediate revisions by the same user not shown) | |||
| Line 1: | Line 1: | ||
| + | [[file:Uo_4.jpg|480px|thumb]] | ||
==New Player Guide== | ==New Player Guide== | ||
| − | + | <b><i><blockquote>"To survive in this hostile land thou must first know thyself! Seek ye to master thy weapons and thy magical ability! Take care in these thy first travels in Britannia... Until thou dost know well thyself, travel not far from the safety of the townes!" -- Lord British</i></b></blockquote> | |
| − | <b><i>"To survive in this hostile land thou must first know thyself! Seek ye to master thy weapons and thy magical ability! Take care in these thy first travels in Britannia... Until thou dost know well thyself, travel not far from the safety of the townes!" | ||
| − | -- Lord British</i></b> | ||
[[File:Tapa.jpg|900px]] | [[File:Tapa.jpg|900px]] | ||
| − | This New Player guide will help you get headed in the right direction and answer most of your basic questions to play on UO Evolution Shard | + | This New Player guide will help you get headed in the right direction and answer most of your basic questions to play on UO Evolution Shard. Make sure you READ THE WIKI for our custom information, [[Commands]], and [[How to Connect]] with our patch! |
| − | |||
| − | Make sure you | ||
[http://www.uoevo.com/wiki UOE Wiki]<br> | [http://www.uoevo.com/wiki UOE Wiki]<br> | ||
| Line 38: | Line 35: | ||
Read the [[Rules]], the [[Lost Items]] section and the entire WIKI! There is a lot of custom info and WARNINGS you need to be aware of before you play in-game. This will save you a lot of time and frustration!<br> | Read the [[Rules]], the [[Lost Items]] section and the entire WIKI! There is a lot of custom info and WARNINGS you need to be aware of before you play in-game. This will save you a lot of time and frustration!<br> | ||
| − | Watch the New Player Intro [https://youtu.be/jqyUDK1M3JI Video] | + | >>>Watch the New Player Intro [https://youtu.be/jqyUDK1M3JI Video] |
| + | |||
| + | >>>New Player Walkthrough [https://youtu.be/hp0_krXhK4g?list=PL1fgGAzRBeuTcyZFlal4nfT3B7k8COqOP Video] | ||
| − | New Player | + | >>>New Player Dungeon [https://www.youtube.com/watch?v=_XBTRQID2as Video] |
Sign up on the [http://www.uoevo.com/forum UOE Forums] this is how we announce events, rule changes and shard info. If you have trouble registering, contact a gm in game to make you an acct (if you are unable to make a forum acct, contact a gm in-game)<br> | Sign up on the [http://www.uoevo.com/forum UOE Forums] this is how we announce events, rule changes and shard info. If you have trouble registering, contact a gm in game to make you an acct (if you are unable to make a forum acct, contact a gm in-game)<br> | ||
| Line 48: | Line 47: | ||
Connect with us on Discord. Here is our [http://www.discord.gg/JwEBhPH Discord Channel Invite] | Connect with us on Discord. Here is our [http://www.discord.gg/JwEBhPH Discord Channel Invite] | ||
| − | Download our patch and client, you must use this one to see the custom content! Also read the section [[How to Connect]] | + | Download our custom patch and client, you must use this one to see the custom content! Also read the section [[How to Connect]] |
==Create your Character== | ==Create your Character== | ||
| Line 99: | Line 98: | ||
It is important to work on your skills to become more powerful and to accomplish certain goals in the game. Read the section on [[Skill Training]] and then read the details of each individual skill under [[Skills Defined]] | It is important to work on your skills to become more powerful and to accomplish certain goals in the game. Read the section on [[Skill Training]] and then read the details of each individual skill under [[Skills Defined]] | ||
| − | There is a new player area on top of Lord British's Castle and is a great place to learn and train. There are many items for new players on the various stone vendors located at Britain Bank and Trinsic bank. There are new player quests, players guide and other starter items. Seek out the training room and a NEW player guild in Serpent's Hold, all accessible from the public moongate>new player gates | + | There is a new player area on top of Lord British's Castle and is a great place to learn and train. There are many items for new players on the various stone vendors located at Britain Bank and Trinsic bank. There are new player quests, players guide and other starter items. Seek out the training room and a NEW player guild in Serpent's Hold, all accessible from the public moongate>new player gates |
| + | |||
| + | Also start collecting [[Power Scrolls]] You will need them for all of your skills in the future. You need these scrolls to get your skills from 100 to 120 | ||
TIP: Save your starting 700 skillball for the high end of the skills and buy/train the lower end | TIP: Save your starting 700 skillball for the high end of the skills and buy/train the lower end | ||
| Line 168: | Line 169: | ||
1. Open your Razor Gump<br> | 1. Open your Razor Gump<br> | ||
2. Select the "General" Tab<br> | 2. Select the "General" Tab<br> | ||
| − | 3. Select filters and scroll down the list to " | + | 3. Select filters and scroll down the list to "[[Light Level]]"<br> |
4. Check the box<br> | 4. Check the box<br> | ||
===Paperdoll Gump=== | ===Paperdoll Gump=== | ||
| − | + | [[file:Paperdoll.png|thumb]] | |
The Paperdoll is one of the most important and commonly used menu in the game. You used it to change your character clothing and equipment. You can also access other important menus such as Options and Log Out | The Paperdoll is one of the most important and commonly used menu in the game. You used it to change your character clothing and equipment. You can also access other important menus such as Options and Log Out | ||
| Line 188: | Line 189: | ||
===Read info and Explore Moongates=== | ===Read info and Explore Moongates=== | ||
There are many helpful Blue website stones near most of the new player areas. If you click the stone, it will load the wiki/website page with the information about the specific area | There are many helpful Blue website stones near most of the new player areas. If you click the stone, it will load the wiki/website page with the information about the specific area | ||
| + | |||
| + | There are Blue "Moongates" in each city and to most major location on the shard. The Moongates help you travel easier throughout the realms. | ||
Make sure you explore the following areas on the "New Player Gates" on the moongate: | Make sure you explore the following areas on the "New Player Gates" on the moongate: | ||
| Line 193: | Line 196: | ||
*Go to the New player Dungeon and learn how to use your skills and equipment | *Go to the New player Dungeon and learn how to use your skills and equipment | ||
*Go to the Training room to work up your skills and stats | *Go to the Training room to work up your skills and stats | ||
| − | * | + | *Use the New Player Rune Library, there are many marked areas for quests, locations and animals taming |
===Your First Week on the Shard=== | ===Your First Week on the Shard=== | ||
| + | [[File:Noob.jpg|thumb]]<br> | ||
| + | [[File:Be prepared.jpg|thumb]] | ||
| + | [[File:New player.jpg|thumb]] | ||
After you learn the basic movements, know the commands and can communicate with other players you can start working on these tasks. This is a good list of goals to work on your first 2 weeks on the shard:<br> | After you learn the basic movements, know the commands and can communicate with other players you can start working on these tasks. This is a good list of goals to work on your first 2 weeks on the shard:<br> | ||
| Line 212: | Line 218: | ||
*Gather resources<br> | *Gather resources<br> | ||
*Complete the easy Quests<br> | *Complete the easy Quests<br> | ||
| − | |||
*Join the New Player guild<br> | *Join the New Player guild<br> | ||
*Complete Bulk Order Deeds (BODs)<br> | *Complete Bulk Order Deeds (BODs)<br> | ||
| Line 218: | Line 223: | ||
*Build a small house | *Build a small house | ||
*Scout for a large house location | *Scout for a large house location | ||
| + | *Complete the NPC [https://uoevo.com/wiki/Escort_Quests#Escort_Quests Escort Quests] | ||
===Your Second Week on the Shard=== | ===Your Second Week on the Shard=== | ||
| Line 233: | Line 239: | ||
===Your Third Week on the Shard=== | ===Your Third Week on the Shard=== | ||
| + | *Try the "safe" New Player Champ Spawn | ||
| + | *Go to public New Player Champ Spawn Events | ||
*Go to public Champ Spawn Events | *Go to public Champ Spawn Events | ||
| − | *Go to safe | + | *Work on collecting [[Power Scrolls]] |
| + | *Go to "safe" town invasions | ||
| + | |||
| + | ===Gear Progression Guide=== | ||
| + | |||
| + | This is information on what items to seek in-game to progress to the best end-game items | ||
| + | |||
| + | The information is set up with the easy items first, then > and the next item to seek in progression of gear<br> | ||
| + | |||
| + | If you want a Mage Build, look at these [[Mage Items]]<br> | ||
| + | If you want a Sword Build, look at these [[Sword Items]]<br> | ||
| + | |||
| + | ==How to find answers== | ||
| + | |||
| + | 1. READ the WIKI for all custom information, help guides and shard details | ||
| + | [http://www.uoevolution.com/wiki UO Evolution Wiki] | ||
| + | |||
| + | 2. Read the forums - post game suggestions or general game related questions there | ||
| + | [http://www.uoevolution.com/forum UO Evolution Forum] | ||
| + | |||
| + | 3. Use common sense, most major areas are on the moongate - go explore! | ||
| + | |||
| + | 4. Ask players in game, use [c to chat | ||
| + | |||
| + | 5. Ask players in Discord for info, Discord Channel Invite: [http://www.discord.gg/JwEBhPH Discord Invite] | ||
| + | |||
| + | 6. Google it! [http://www.google.com Google] | ||
| + | |||
| + | 7. Use the [http://www.uoguide.com UO Guide] and [http://www.stratics.com Stratics] for general ultima game info | ||
| + | |||
| + | 8. Use the rune libraries and read the common [[Questions]] section | ||
| + | |||
| + | 9. New player guild has many helpful players that will happily answer questions | ||
| + | |||
| + | 10. Send a general help page in game to get help from the GM online | ||
==NEW Player Guild== | ==NEW Player Guild== | ||
| + | The NEW Player guild is a great place to start your journey. Many nice veteran players will help you avoid mistakes. Here is a nice [[Newbie Guide]] written by Seregon | ||
| + | |||
There is a [NEW] Player Guild that is currently run by Staff and veteran UOE players and is very helpful. If you dont know much about the game or need help getting started, this guild will be great for you. The staff members and veteran players help guide new players and get them used to the rules, wiki and general gameplay. The guild plans easy events and group hunts to teach players where to explore and how the game works. After you get used to the shard we encourage you be active in the NEW guild and help others or to join a player run guild of your choice. | There is a [NEW] Player Guild that is currently run by Staff and veteran UOE players and is very helpful. If you dont know much about the game or need help getting started, this guild will be great for you. The staff members and veteran players help guide new players and get them used to the rules, wiki and general gameplay. The guild plans easy events and group hunts to teach players where to explore and how the game works. After you get used to the shard we encourage you be active in the NEW guild and help others or to join a player run guild of your choice. | ||
To join NEW guild, grab any player with the NEW tag and ask them to get you in contact with the NEW Guildmaster or an Emissary. | To join NEW guild, grab any player with the NEW tag and ask them to get you in contact with the NEW Guildmaster or an Emissary. | ||
| − | If you are unable to find a NEW player pm | + | If you are unable to find a NEW player pm Admin Dante in game or Discord. |
NEW Guild Hall (Courtesy of Tiger) | NEW Guild Hall (Courtesy of Tiger) | ||
| Line 250: | Line 294: | ||
NEW Guild Library | NEW Guild Library | ||
<gallery> | <gallery> | ||
| − | + | File:Newrunelibrary.png | |
</gallery> | </gallery> | ||
| + | |||
| + | ===Beware of PvP=== | ||
| + | <i><b><blockquote>"In the land of Britannia, danger is not confined to the realm of monsters and beasts. Betrayal, deceit, and treachery are ever-present threats, lurking in the hearts of men. Trust not lightly, for even the noblest of allies may harbor hidden agendas." -- Lord British</i></b></blockquote> | ||
| + | |||
| + | Watch out for "evil" players that may attempt to trick you out of your treasure or lure you to a hostile shard facet with the intent to murder you! Player vs Player combat is allowed in Felucca... | ||
==Survival Tips== | ==Survival Tips== | ||
| + | |||
| + | <i><b><blockquote>"Remember, adventurer, that in the world of Britannia, death is not the end, but merely a passage to the next realm. Yet do not take this knowledge lightly, for the journey to the afterlife is fraught with peril, and the consequences of thy actions may follow thee beyond the grave. Choose thy path wisely, for the fate of Britannia hangs in the balance." -- Lord British</i></b></blockquote> | ||
| + | |||
| + | [[File:Resurrect.jpg|thumb]] | ||
*Insure your items<br> | *Insure your items<br> | ||
*Only carry what you need<br> | *Only carry what you need<br> | ||
| Line 260: | Line 313: | ||
*Join a guild<br> | *Join a guild<br> | ||
*Don't be fooled into traveling into Felucca with players offering "help", they will kill you<br> | *Don't be fooled into traveling into Felucca with players offering "help", they will kill you<br> | ||
| − | *Know where your closest Resurrect spot is located | + | *Know where your closest Resurrect spot is located BEFORE a battle<br> |
*If you are stuck, use the "HELP" button<br> | *If you are stuck, use the "HELP" button<br> | ||
*Use chat to politely ask for a rescue<br> | *Use chat to politely ask for a rescue<br> | ||
*Do not travel in Felucca before you know how to PVP<br> | *Do not travel in Felucca before you know how to PVP<br> | ||
| − | *If you die, you can use the Help button to self resurrect 1 time/30 minutes | + | *If you die, you can use the Help button to self-resurrect 1 time/30 minutes |
| + | *Set UO Steam to [[Auto-Heal]] yourself | ||
===Resurrection=== | ===Resurrection=== | ||
| Line 302: | Line 356: | ||
===Insuring Items=== | ===Insuring Items=== | ||
| − | + | [[File:Insurancegump.png|thumb]] | |
Insurance options can be found by left clicking on your character in game and opening a menu | Insurance options can be found by left clicking on your character in game and opening a menu | ||
| − | Insured items must be in your main (top) backpack or equipped to be kept | + | Insured items must be in your main (top) backpack or equipped to be kept upon death! |
Why Buy Insurance? | Why Buy Insurance? | ||
It will protect you from loss in the event of an unexpected death, pk, pvp, afk and other events out of your control | It will protect you from loss in the event of an unexpected death, pk, pvp, afk and other events out of your control | ||
| + | |||
| + | Note: Even though you have a Gold Ledger, it is a good idea to have extra "loose" gold in your bank as a safeguard. It is also important to always carry your ledger in your top pack, if you have it in a bag it can be dropped! | ||
===Account Bound Items=== | ===Account Bound Items=== | ||
Latest revision as of 09:04, 25 August 2024
Contents
New Player Guide
"To survive in this hostile land thou must first know thyself! Seek ye to master thy weapons and thy magical ability! Take care in these thy first travels in Britannia... Until thou dost know well thyself, travel not far from the safety of the townes!" -- Lord British
This New Player guide will help you get headed in the right direction and answer most of your basic questions to play on UO Evolution Shard. Make sure you READ THE WIKI for our custom information, Commands, and How to Connect with our patch!
UOE Wiki
UOE Forum
Also see Questions
How To Play Ultima Online - UO Guides/Websites
If you have never played Ultima Online, it's a good idea to take a look at this website. They provide detailed rules, quest info and detailed information about the basics of Ultima Online and original systems.
How To Play Ultima Online Evolution Free Shard
If you have played Ultima Online, but not on UO Evolution, it's a good idea to take a look at these links. They provide rules, commands and warnings about UO Evolution's custom systems.
Getting Started
Welcome to Ultima Online Evolution!
Ultima Online Evolution is a massively multiplayer online role-playing game. UOE allows you to choose what sort of profession you want to be in, and also enables you to customize every single one of your skills! Interact with an incredible player base and make new friends, meet new challenges, and explore a variety of lands and dungeons. You can also buy a plot of land and design your own house from top to bottom - then fill it with a collection of rare items and decorations. Wield powerful magic and slay your foes with a sword in hand, or even pilfer the possessions of unsuspecting passers-by and earn your living as an infamous rogue! You could also raise your shield in defense of the land by becoming a paladin, or perhaps whisper words of destruction as you journey down the path of necromancy. There are limitless possibilities with only your imagination to bridle them - so take hold of the reins and choose your own destiny!
Before you log in:
Read the Rules, the Lost Items section and the entire WIKI! There is a lot of custom info and WARNINGS you need to be aware of before you play in-game. This will save you a lot of time and frustration!
>>>Watch the New Player Intro Video
>>>New Player Walkthrough Video
>>>New Player Dungeon Video
Sign up on the UOE Forums this is how we announce events, rule changes and shard info. If you have trouble registering, contact a gm in game to make you an acct (if you are unable to make a forum acct, contact a gm in-game)
Also if you use Facebook, like us and get event updates and current news
Connect with us on Discord. Here is our Discord Channel Invite
Download our custom patch and client, you must use this one to see the custom content! Also read the section How to Connect
Create your Character
Selecting a Name
Your character's name is probably the first, most important impression other players will have of you. Offensively named characters may be assumed to be offensive and treated rudely. If you wish to be taken seriously, choose a name for your character wisely, as your character will be stuck with that label for life.
Ultima Online Evolution does not allow redundant naming, Most names are allowed, although offensive names are screened, and a few names of important characters (e.g., British, Blackthorn) are reserved.
Please try and pick a roleplaying type of name that fits the era. Names that contain curse words, drug references or disturbing names will be changed by staff.
Seriously offensive names will be changed or deleted without warning!
Selecting a Race
Human
If you decide to choose the Human race you will start with four class abilities. They are Strong Back, Tough, Workhorse, and Jack of all Trades.
- Strong Back – Increased carrying capacity determined by strength.
- Tough – Regenerates Hit Points faster than normal.
- Workhorse – Increased ability to gather more resources Example: ore, leather, food.
- Jack of all Trades – Humans have skill points in all skills even untrained.
Elven
If you decide to choose the Elven race you will with six class abilities. They are Night Sight, Infused with Magic, Knowledge of Nature, Difficult to Track, Perception, Wisdom.
- Night Sight – always have the effect of full night sight spell.
- Infused with Magic – Increased energy resistance.
- Knowledge of Nature – Increased chance to gain special resources.
- Difficult to Track – Difficulty increased while trying to track elves.
- Perception – Gain an increased chance to passively detect hidden monsters and enemies.
- Wisdom – receive a bonus to their maximum mana.
Gargoyle
Gargoyles are not well supported with gear and are mainly good for Roleplaying, they are not recommended as your main character. If you decide to choose the Gargoyle race you will start with four class abilities. They are Flying, Berserk, Master Artisan, Deadly Aim, Mystic Insight.
- Flying – Allows you to fly as fast as a mount could travel, plus allows you to get to certain gargoyle areas.
- Berserk – when your Hit Points drop low it gives up some of your defense for a boost in speed and power.
- Master Artisan – Increased chance to imbue and unravel items.
- Deadly Aim – Allows them to use the throwing weapons.
- Mystic Insight – allows you to cast basic mysticism spells without failure.
Selecting a Profession
Selecting a profession is not that important on this shard because there are no skill caps. That means you can become proficient in all of the professions eventually. You also receive a skillball with 700 skill points to raise your skills once you log in.
This is mainly a PVE and PVM shard with PVP allowed in Felluca. The main focus on this shard in the beginning will be to obtain good pets and tame/lore skill
Work on Skills
It is important to work on your skills to become more powerful and to accomplish certain goals in the game. Read the section on Skill Training and then read the details of each individual skill under Skills Defined
There is a new player area on top of Lord British's Castle and is a great place to learn and train. There are many items for new players on the various stone vendors located at Britain Bank and Trinsic bank. There are new player quests, players guide and other starter items. Seek out the training room and a NEW player guild in Serpent's Hold, all accessible from the public moongate>new player gates
Also start collecting Power Scrolls You will need them for all of your skills in the future. You need these scrolls to get your skills from 100 to 120
TIP: Save your starting 700 skillball for the high end of the skills and buy/train the lower end
Communication
Many players enjoy verbal communication in-game. We have set up Discord software on this server, which allows you to connect and speak with other players. You just need a standard computer microphone and connect with www.discord.gg/JwEBhPH
Most of your communication in Ultima Online will be done by typing. Whatever you type on your keyboard will appear above your character's head. Your speech will be heard (seen) by anyone on the same screen. There are also chat [c and private messenger [pm features you can use. There are additional keystrokes that allow you to use speech in specific ways; to yell or to whisper.
Contacting Staff - We have a very friendly, full-time staff online 7 days a week. Feel free to contact us through the page system with any help or questions
Emote - Voice inflection is not easily translated by typing; however, UO allows you to emote your feelings. By typing a colon ":" followed by a space, your text entry will be emoted. Your "emote" will be surrounded by asterisks and will be a different color than your normal speech. Emotes (emotions) allow you to suggest an action that your character is doing to immerse yourself in the environment. *kicks dirt* *twirls hair* *sighs* Many players also set up macros for common emotes, such as smiles, laughs, grins, frowns, etc.
Whisper - Use a semi-colon ";" followed by a space (e.g., ; Psst, wanna buy a chicken?). Whispered text can only be "heard" by characters immediately adjacent to you.
Yell - Use an exclamation point "!" followed by a space (e.g., ! HELP!). Yelled text can be "heard" by any character up to a screen and a half away.
Global Chat uses [c yourmessagehere
Guild Chat uses [g
Private Message uses [pm playername msg
IRC Chat uses [i
PVP Chat uses [pvp
Roleplay Chat uses [rp
Trade Chat uses [tr
Talking With NPCs
Before you can talk to NPCs, you must first get their attention. Thus, everything you ask NPCs must include their name. To get the name of an NPC hover the cursor over him or her. With vendors or shopkeepers, you need only employ their job title. For example, if you wish to buy something from a Vendor, get physically close to one and say, "Vendor buy." If, for some reason, the vendor ignores you, then you might want to preface "buy" with the vendor's name, or you may click the vendor to access a menu of interactions.
As the example above also illustrates, you don't have to speak in complete sentences when you address NPCs. You can ask NPCs about things like the time and locations of places nearby.
Training From NPCs
When you're a new player, one way to jump start your progress in a given skill is to pay for training from an NPC. To obtain training in the basic professions, go to a shop related to that profession. Then, get physically close to the NPC shopkeeper or tradesman, and say, "[name of NPC] train," or click on the NPC to get a menu of possible interactions, and select Train. The NPC will then tell you the various skills he is qualified to teach. Pick the one you're interested in and say, "[name of NPC] train [name of skill]." The NPC will give you a price to teach you all he or she can. To train in that skill, drag an appropriate amount of gold onto the vendor to pay him or her. You can pay less and get less than the full training the NPC can offer.
Vendors
There are two kinds of vendors: Player-owned vendors and NPC shopkeepers. Player-owned vendors allow players to sell things to other players, even when they're not logged in. Vendors are indestructible and will not move from the site where they are placed (as long as they are paid).
Make sure you vendor has plenty of gold on him at all times. If your vendor runs out of gold, he will quit and auto-delete.
There are several vendor mall areas to choose from. You purchase a deed from the mall manager and target a white tile to set up the NPC vendor.
NPC shopkeepers are also called vendors, and are usually found in shops within town.
Interacting With Vendors - To talk to a vendor, the greeting and action must be on the same line ("Vendor buy"). Greetings include the vendor's name or title.
Valid Requests Include:
Buy: The vendor will display his inventory so you can browse his goods and ask you to target the item to buy. A prospective customer can use Arms Lore or Item Identification on the items. The gold is removed from your inventory if you are carrying it, or from the bank if you're not. If you are the owner, he will tell you that you don't need to buy the items. NOTE: when buying from a player-owned vendor, gold can always be withdrawn from the bank. When buying from an NPC shopkeeper, only gold for purchases over 2000 gp may be drawn from the bank.
Sell: Players can sell items to NPC shopkeepers who are interested in buying them. Usually you'll need to find a vendor who is already selling what it is you're trying to sell.
Train: This will prompt the NPC to offer you a list of skills they can teach.
Train (skill): This will prompt the NPC to tell you the price to train in a specific skill they teach. To train in that skill, drag an appropriate amount of gold onto the vendor to pay him or her. You can pay less and get less than the full training the NPC can offer.
Status/Info: If you are the owner of a player-owned vendor, the vendor will describe his status, including how much gold he's holding, how much he charges per day, and how many more days he will continue working, assuming nothing changes.
See the Vendors section for more detailed info
Once You Log In
Set Screen Size
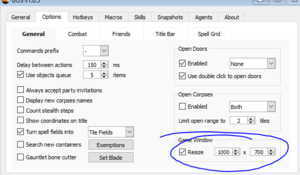
You may need to set your screen size/resolution to see the game properly. With all the new giant screen monitors and high definition setting can make the game screen look tiny. There is a guide here to Set Screen Size
Set Light Level
There is no longer a need for the night sight skill, that lets you see in the dark. You can now set your light levels in UO Razor or UO Steam to always be daylight
1. Open your Razor Gump
2. Select the "General" Tab
3. Select filters and scroll down the list to "Light Level"
4. Check the box
Paperdoll Gump
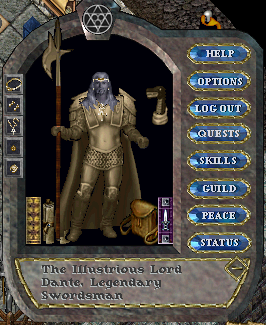
The Paperdoll is one of the most important and commonly used menu in the game. You used it to change your character clothing and equipment. You can also access other important menus such as Options and Log Out
The Paperdoll is your primary means of changing clothing and armor for your character. To remove an item, move your cursor over the item, left-click and drag the item away. You can now place that item in your backpack or another container. To equip an item, reverse the process. If you already have an item equipped that takes up the slot of the item you are trying to equip, a click noise will be made and the item will remain on your cursor when released.
There are 19 different equipment slots:
Belt - Bracelet - Back - Chest - Sash - Earrings - Footwear - Gloves - Head - Left Hand - Legging - Neck - Right Hand - Ring - Robe - Shirt - Skirt - Sleeves - Talisman
The Head, Earring, Neck, Ring, and Bracelet have boxes on the left side for easier removal of those items.
Say Hello and Chat
Once you log in you will find yourself at Britain Bank. Here you will find many players to interact with. Use the command [c to public chat. There is also a moongate system to explore, which will allow you travel throughout the world.
Read info and Explore Moongates
There are many helpful Blue website stones near most of the new player areas. If you click the stone, it will load the wiki/website page with the information about the specific area
There are Blue "Moongates" in each city and to most major location on the shard. The Moongates help you travel easier throughout the realms.
Make sure you explore the following areas on the "New Player Gates" on the moongate:
- Go to Britain Castle, there are lots of places to explore, buy skills and shop
- Go to the New player Dungeon and learn how to use your skills and equipment
- Go to the Training room to work up your skills and stats
- Use the New Player Rune Library, there are many marked areas for quests, locations and animals taming
Your First Week on the Shard
After you learn the basic movements, know the commands and can communicate with other players you can start working on these tasks. This is a good list of goals to work on your first 2 weeks on the shard:
- Read the wiki and forum
- Explore your surroundings
- Buy your skills up to 30
- Work on gaining skills
- Train in the new player's training room
- Visit the New Player Dungeon and learn, you can watch the New Player Dungeon Video
- Visit the New Players Guild
- Use the Rune Library
- Work on increasing your stats
- Create macros and hotkeys
- Make friends
- Develop a strong pet
- Gather resources
- Complete the easy Quests
- Join the New Player guild
- Complete Bulk Order Deeds (BODs)
- Locate the best hunting spots for your skill level
- Build a small house
- Scout for a large house location
- Complete the NPC Escort Quests
Your Second Week on the Shard
- Fishing
- Gold Panning
- Go to New Player Events
- Build a larger house, 18x18 plot
- Work on the Task System, use the [event command
- Complete the Medium Quests
- Work with a group or guild to learn and defeat hard monsters
- Make a Vendor to buy and sell items
- Breed Pets
- Work on a levelable weapon for champ spawns
Your Third Week on the Shard
- Try the "safe" New Player Champ Spawn
- Go to public New Player Champ Spawn Events
- Go to public Champ Spawn Events
- Work on collecting Power Scrolls
- Go to "safe" town invasions
Gear Progression Guide
This is information on what items to seek in-game to progress to the best end-game items
The information is set up with the easy items first, then > and the next item to seek in progression of gear
If you want a Mage Build, look at these Mage Items
If you want a Sword Build, look at these Sword Items
How to find answers
1. READ the WIKI for all custom information, help guides and shard details UO Evolution Wiki
2. Read the forums - post game suggestions or general game related questions there UO Evolution Forum
3. Use common sense, most major areas are on the moongate - go explore!
4. Ask players in game, use [c to chat
5. Ask players in Discord for info, Discord Channel Invite: Discord Invite
6. Google it! Google
7. Use the UO Guide and Stratics for general ultima game info
8. Use the rune libraries and read the common Questions section
9. New player guild has many helpful players that will happily answer questions
10. Send a general help page in game to get help from the GM online
NEW Player Guild
The NEW Player guild is a great place to start your journey. Many nice veteran players will help you avoid mistakes. Here is a nice Newbie Guide written by Seregon
There is a [NEW] Player Guild that is currently run by Staff and veteran UOE players and is very helpful. If you dont know much about the game or need help getting started, this guild will be great for you. The staff members and veteran players help guide new players and get them used to the rules, wiki and general gameplay. The guild plans easy events and group hunts to teach players where to explore and how the game works. After you get used to the shard we encourage you be active in the NEW guild and help others or to join a player run guild of your choice.
To join NEW guild, grab any player with the NEW tag and ask them to get you in contact with the NEW Guildmaster or an Emissary.
If you are unable to find a NEW player pm Admin Dante in game or Discord.
NEW Guild Hall (Courtesy of Tiger)
NEW Guild Library
Beware of PvP
"In the land of Britannia, danger is not confined to the realm of monsters and beasts. Betrayal, deceit, and treachery are ever-present threats, lurking in the hearts of men. Trust not lightly, for even the noblest of allies may harbor hidden agendas." -- Lord British
Watch out for "evil" players that may attempt to trick you out of your treasure or lure you to a hostile shard facet with the intent to murder you! Player vs Player combat is allowed in Felucca...
Survival Tips
"Remember, adventurer, that in the world of Britannia, death is not the end, but merely a passage to the next realm. Yet do not take this knowledge lightly, for the journey to the afterlife is fraught with peril, and the consequences of thy actions may follow thee beyond the grave. Choose thy path wisely, for the fate of Britannia hangs in the balance." -- Lord British
- Insure your items
- Only carry what you need
- Bond your pets
- Travel with trusted friends
- Join a guild
- Don't be fooled into traveling into Felucca with players offering "help", they will kill you
- Know where your closest Resurrect spot is located BEFORE a battle
- If you are stuck, use the "HELP" button
- Use chat to politely ask for a rescue
- Do not travel in Felucca before you know how to PVP
- If you die, you can use the Help button to self-resurrect 1 time/30 minutes
- Set UO Steam to Auto-Heal yourself
Resurrection
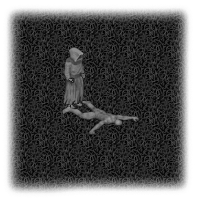
If you die in game, you must get resurrected before your items decay There are 4 options to get resurrected
- Player - Players with skill can cast the resurrection spell
- Ankh - Ankhs are set up in most towns and at the entry of most dungeons
- Healer - There are healer shops in most towns and wandering healers in random locations
- Self Ressurrect 1 time per 30 minutes with the [selfres command
Corpse Retrieval
If you lose the location of your body or cannot return to the location you died, you can use the Corpse Retrieval stone located at Britain Bank. There is a gold cost to get your body returned
Warning: The stone will return only the last body, so if you have had multiple deaths, it may return the last empty body. For best results, use the stone to return your body on the first death
"I am Stuck" Help Option
What is this?
- At the top of your screen you will see a thin, movable bar, with the buttons Map, Paperdoll, Inventory, Chat and HELP
- Click the Help button.
- You will then see a window open, with options for what type of help you need.
- You will choose the option that says "My player is physically stuck..."
- You will be teleported in a couple of minutes to a town WITHIN the facet you are currently located
Insurance and Bless Items
Bless Item
This shard has several safe options to help protect your items from being lost or stolen. It is best to use a Bless Item Deed on all your top items. There is also a bless clothing deed.
If you use a Bless Item deed, items are permanently blessed. As long as you are wearing them or they are in your TOP MOST BACKPACK, then they will return to you when you are killed without having to recover your corpse.
Insuring Items
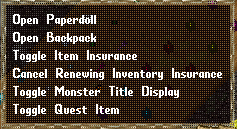
Insurance options can be found by left clicking on your character in game and opening a menu
Insured items must be in your main (top) backpack or equipped to be kept upon death!
Why Buy Insurance? It will protect you from loss in the event of an unexpected death, pk, pvp, afk and other events out of your control
Note: Even though you have a Gold Ledger, it is a good idea to have extra "loose" gold in your bank as a safeguard. It is also important to always carry your ledger in your top pack, if you have it in a bag it can be dropped!
Account Bound Items
These items can not be traded to anyone else. They are bound to your account. You may bless them or insure them as any normal item, but being account bound does NOT mean they are blessed by default.
How To...
UO Evolution - How to Guide Q&A:
How to walk/run around: right click and hold the button down in the direction you wish to go the further your cursor is away the faster you travel.
How to open backpacks, containers, gates and doors from your hotbar and 'in game': left click once on your hotbar (backpack icon), double left click a container/corpse/gate/door 'in game'.
How do I set up my Loot Bag?: See Loot Bag Setup
How do I buy skills off an instructor?: To 'buy' skill <right click> on the instructor, a menu will appear saying 'train skill i.e. 'train fencing' etc. Click the skill you wish to get additional training in and the instructor will tell you how much to pay. Drag your pile of gold with your mouse to bring up the quantity box, type in the amount and separate it from the gold pile. Then drag this amount onto the head of the instructor and release. He will take your gold and increase your skill to 40 points.
How to speak with Quest Givers: double left click on them.
How do I accept quests and see what quests I have accepted?: To Accept a quest double left click an npc that has 'quest giver' in his/her title on mouse over, a menu will open for you to read, select 'accept'. To view what quests you have accepted go to the menu bar, select Quest Menu, a window will open up listing your current quests, you may cancel quests in this same window.
How to 'Toggle Quest Items': hold the shift key, right click on yourself, select 'Toggle Quest Item', with the target cursor left click on the item you wish to toggle (it turns orange) and press <esc> to finish the toggle.
How to open your paperdoll: left click on the hotbar icon (shaped like a head).
How to equip items: left click and hold cursor on item, drag to the paperdoll slot or onto the main paperdoll graphic.
How to open the map: left click once on the hotbar icon for the map (characterized by the letter N note: to view the large map, click the small square at the top of the small round radar map, clicking the 'tick' top right will return you to the radar map) .
How to turn 'war' mode on and off: by left clicking on the war/peace toggle icon on the main hotbar bottom left (crossed swords).
How to attack a monster: by left clicking it to target while in war mode.
How to equip items to a hotbar: eg, bandages, spell scrolls, potions, etc by left clicking and dragging the item to the bar, left clicking once will 'use' the item. (note, you can right click an item once placed in a hotbar and select a targeting option of 'self' 'cursor' or 'current'.
How to get resurrected if you die: (and you are meant to die in the tutorial, so don't worry you don't 'suck'). Look on your map for a 'healer' who will resurrect you, recognized by a small 'red dot' waypoint.
Glossary
Glossary:
Bank box:
Each character starts the game with access to a bank box. This box is where you can store your items or gold and anything else you wish to keep. The box holds 125 items. To access your bank box go to any bank in game and say 'Bank' and it will open. Other commands used at the bank are 'Balance' to give you a current balance, 'Check' if you wish to convert your gold to a check so it is able to be carried in larger quantities, 'Withdraw 100' to take 100gps out of your bank.
Escorts:
Around New Haven are various quest givers called, 'wandering mages', 'merchants' 'nobles' 'brides' and 'grooms'. Each of these will be titled 'quest giver' and will want you to 'escort' them to various places in New Haven eg, 'accompany me to the New Haven Inn'. By accepting the quest, the quest giver will follow behind you and once you arrive at the destination will give you and additional 500gps for your effort, as well as giving you some compassion* gains. For more information see escorting.
Insurance:
All items you wear or equip may be insured against loss for the amount of 600 gps per item. To insure an item, put it in your backpack, right click your avatar (yourself) on screen. A menu will open, scroll to 'toggle item insurance' and click, you will get a target cursor to target the item with. You may need to put your cursor back over the item to check that it is insured. Do this for any item you wish to insure. Insuring will only work the first time you die unless you have also set the insurance to renew. To set the insurance to renew follow the steps as above only select 'auto renew inventory', you will get a prompt to say you have elected to reinsure items on death. This will cost you 600gps per item per death but will automatically reinsure your items.
Loot Bag
Loot bags are a special container that will collect and separate your loot. You can choose what type of items to collect and then auto delete the garbage. See the Loot Bag Setup info
LRC (lower reagent cost):
Armor or items that have this modification give a % reduction in how many mage/necro/ reagents or tithing gold you need to 'spend' to cast spells. It can go to a maximum of 100% so that spells are nil cost if you have the right suits/items.
Mana:
Is what is used to cast spells, and is gained by your intelligence stat, ie the more intelligence you have the larger your mana pool.
Moongate:
Numerous moongates are located in each facet and are how you may travel to the rest of Britannia. Walking into a moongate will show you a menu. As a young* player you will not be able to travel to the facet of Felucca, as this is where, among other things, player v player combat takes place. You will be able to travel to other places in Trammel, Malas and Ilshenar.
NPC's:
Are what most people call all the 'in game' Non-Player Characters generated by the system. In other words those characters inside the shops who you may buy items from, wandering healers, quest givers, trainers and any human type character who is not a 'real' player.
PVP: player versus player
PVM: player versus monster
Reagent:
Spell casting ' fuel' to cast spells with, different spells take different reagents to cast. mage = black pearl, bloodmoss, ginseng, garlic, mandrake root, nightshade, spiders silk and sulfurous ash. necromancer = batwing, daemon blood, grave dust, nox crystal and pig iron.
Recall/recalling:
This term is used for movement between locations by using a spell (either a recall mage spell/scroll, or paladin sacred journey spell) To recall you need to have the skill/scroll/reagents or tithing points to activate it, and of course a marked rune with the location you wish to travel to marked on it.
Rune:
Is an item which has a location marked on it that you may use to 'move' from place to place with the use of spells, either the 'recall' mage spell or scroll, or the 'sacred journey' paladin spell. Casting the spell and targeting a rune will take you to the location marked on that rune. Mages may 'mark' runes with another spell.
Runebook:
Is a book that you may place marked runes in to various locations, a marked rune book is a book containing runes already marked for various places, eg: the 'towns in trammel' or 'dungeons in trammel'. Runebooks are only available from other players who have the inscription skill, and are sold off player run vendors*.
Rune library:
Is a player house that contains runebooks available for all players to use. Rune Libraries are great for new players as they have 'marked' locations for lots of dungeons and commonly used hunting spots.
Tithe, tithing:
This is the term used by the paladin class to donate gold to a shrine (ankh) as a sign of devotion to the paladin class. To cast any chivalry spell costs 10gps of tithing gold. To tithe gold left click on the ankh, to place it in the target bar, right click on the bar and the menu appears, select 'Tithe Gold' and then toggle the arrows to the amount you wish to tithe.
